The Knife
Note
This book is not anywhere close to complete. For more on its status, please see Status of this Book. Please enjoy this preview as it grows, and if you have feedback, send it to simonstl@simonstl.com.
The knife makes large demands on thought and on the hand. The saw can be operated mechanically while the knife requires a freedom which consists in developing own effort. In hand skills in particular the knife holds a position similar to that which the freer forms for the moment hold; its use is also especially suited for the development of the sense of form in right-angle and curved forms. What counts with the knife is to be able to freely put it to use through a multitude of hand movements, under which the aimed at form must be brought into clear focus, and the nature of the wood and action of the tools steadily observed. – N. Christian Jacobsen, Khristiania (Oslo) January 1892
The knife is one of the most basic human tools, something we have been using for millions of years. It often seems like woodworkers have moved to more refined cutting tools, but working wood with a knife is an excellent place to start. You’ll learn about how wood responds to a cutting edge, and develop an appreciation for wood grain.
You might say that "it’s just a knife", but people with "just a knife" have made astonishing things. No other tool matches its flexibility. No matter how far you go in working wood, a knife will still be a useful tool.
James Krenov, in A Cabinetmaker’s Notebook, points out that "Of all the tools we cabinetmakers have around us, the ones that most neglected are knives… but knives… are really beautiful and versatile tools." (38)
Warning
Knives are wonderful, but more dangerous than most of the tools covered in this book. They combine a longer cutting surface than most tools with a sharp point, and often lack guards. Do not leave knives where others can find them. Always be aware of where the blade is going in relation to your hands and body while cutting.
Choosing a Knife
Knives have come a long way since the early flints, bone, and beaver teeth. You probably have knives already, though odds are good that most of them are meant for food rather than wood. Some kitchen knives, especially short stout knives with smooth edges, can work for wood, but you’re probably better off seeking out a knife meant for wood if you don’t already have one.
Knives, even knives meant for wood, come in many different shapes and sizes. A few of the more common options are shown in Figure 2-1. Please remember that to get started, you only need one of these, not all of them. Your options include:
- Folding knives
-
Whether it’s a Swiss Army knife or a more classic pocket knife, knives that fold protect their blades and are easy to carry. That makes it more likely that you’ll have the knife around when you need it. When choosing a pocketknife, try to find one with quality steel and not too many options. (The big Swiss Army knives are fun to explore but not much fun to handle.)
- Carving knives
-
Not the knife you use to carve meat, but knives built for various styles of carving. They often have shorter (one- to three-inch) blades for precision work, though some have longer blades for rough work.
- Hook, crooked, and other curved knives
-
The curved blades on these knives make it much easier to hollow the insides of curved areas, and can also be used for flat work.
- Replaceable knives
-
A razor blade is a classic replaceable knife, as is a box cutter. X-Acto knives and similar craft knives with replaceable blades take this approach. The blades usually can be sharpened again to some extent, but replacements are readily available if you want a sharp knife quickly or don’t yet want to learn sharpening.
- Marking knives
-
Used to indicate and start cuts for joinery, marking knives are wonderful tools you shouldn’t really use for general cutting and carving. (They’ll get a separate chapter eventually.)
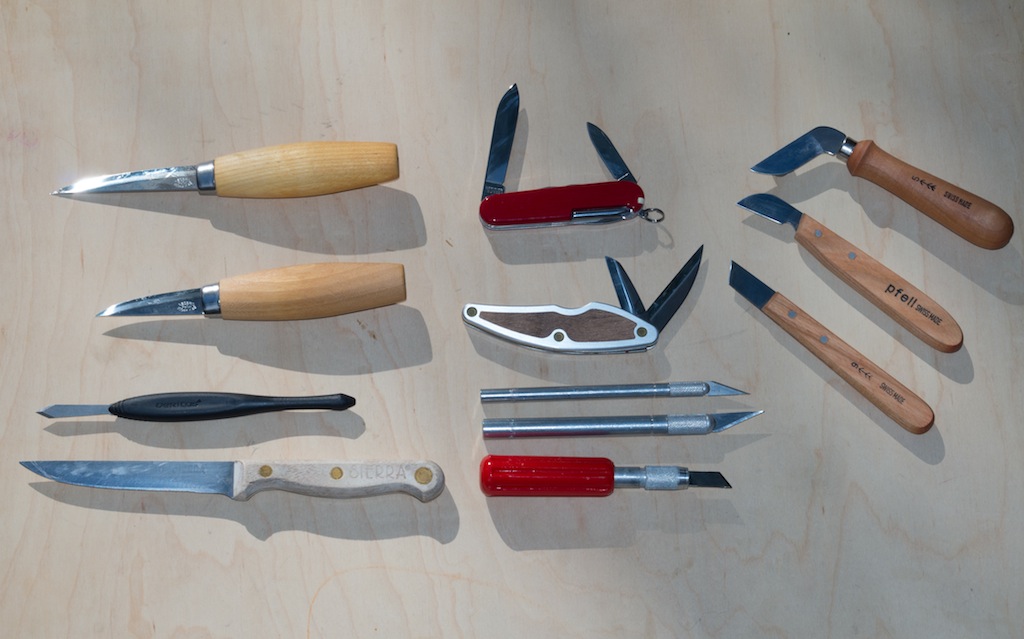
One thing you’ll notice quickly in Figure 2-1 is the different shapes of the knives. Some have curved cutting edges, while others have straight cutting edges. You’ll quickly get used to one or the other. It is possible to reshape a blade using a file, but I can’t recommend that as a starting point for beginners.
Note
If you buy a Swiss Army Knife, you may want to file off the keychain connector, as it’s inconveniently placed. I haven’t filed mine off yet.
Holding Your Work Safely
You’ve probably seen people whittling without gloves, or at least pictures of it. Once carvers develop a sense for how their knife interacts with the wood, they can generally stop the knife before it reaches their skin, or at least before it cuts deeply. (I was very surprised to see many tiny cuts on my thumb appear when I took a shower after a carving session. They’d been invisible until they got wet.)
You need to be especially careful when cutting toward yourself, as in a paring cut. The other main challenge, unless you hold your knife in an unfortunate way or close the blade on your fingers, is the hand (or sometimes lap) that holds the work. You can deal with this in a few different ways:
- Thumb protection
-
Looking like the tips of leather work gloves, a thumb guard ($5) is kind of the carver’s version of a thimble. The rest of your hand stays free to handle a knife. This is an especially good idea for paring cuts (like the one in Figure 2-3) where you pull the knife to your thumb. You can also apply special safety tape to cover your thumb.
- Gloves
-
Carvers’ safety gloves aren’t cheap ($20-25), but they are flexible and hard to cut through. Leather can also work, though it’s warmer and less flexible. Don’t wear a glove on the hand holding the knife - you can’t feel as much and it’s more likely to slip. Restaurant supply stores also carry safety gloves, often at lower prices.
- A strip of leather
-
If you’re working on your lap, a wide piece of leather can protect you from misdirected knife strokes.
- Apron
-
A leather apron can protect you from a variety of cuts on your lap or your chest, and usually gives you some pockets as well.
- Working on a table or bench
-
You can clamp large pieces and especially flat pieces to a bench or table easily, though this can be a headache if you need to move the clamps all the time. You can also put the piece you’re carving on a router mat, which increases friction. If you have one, a bench hook or similar holding device can help. If you get into more complicated carving, you may eventually want to look into benches and vises made with carvers specifically in mind.
A sharp knife is key to safety as well. You can apply much less force and produce much more predictable cuts.
Blood is not a very attractive finish for wood, though it does let you say something extra about how much of yourself you put into the project. Pay close attention to how the knife goes through the wood!
Handling a Knife
When working with wood, you will always want to have a well-honed knife. Dull knives will scrape and chatter, leaving behind a rough surface. You might think this would matter less in soft woods like pine, but it’s often even worse there. Most knives arrive sharp, but if yours isn’t sharp, see Sharpening Knives.
Knives can only cut so much at once. If you can’t make a cut work, back up and try to do achieve the same effect with more and shallower cuts. The details of the piece you’re using may force you to spend more time or take more complicated approaches to produce the result you want.
For carving, you want to control the knife precisely. Knife-throwing is a particularly bad idea. However, even the simple cut where one hand holds the object being cut while the other pushes away from the body isn’t very controlled. It’s good enough for sharpening pencils and possibly for simple roughing, but it gives the knife a lot of freedom to find a path other than the one you meant. If the knife encounters a small knot, for example, the force you apply may instead push the knife sideways.
Knives can be used many ways, but the most common controlled cuts include paring, levering (sometimes called pushing), stop, stab, and chip.
Warning
The tip of your knife is the most delicate part. The tip receives the most leverage and has the least support. You rarely need to worry about this using the cuts below, but be careful if you’re tempted to use the tip of the knife for fine carving details. Inserting the tip into the wood and then twisting hard may leave you with a strangely shaped knife and a piece of metal stuck in the wood.
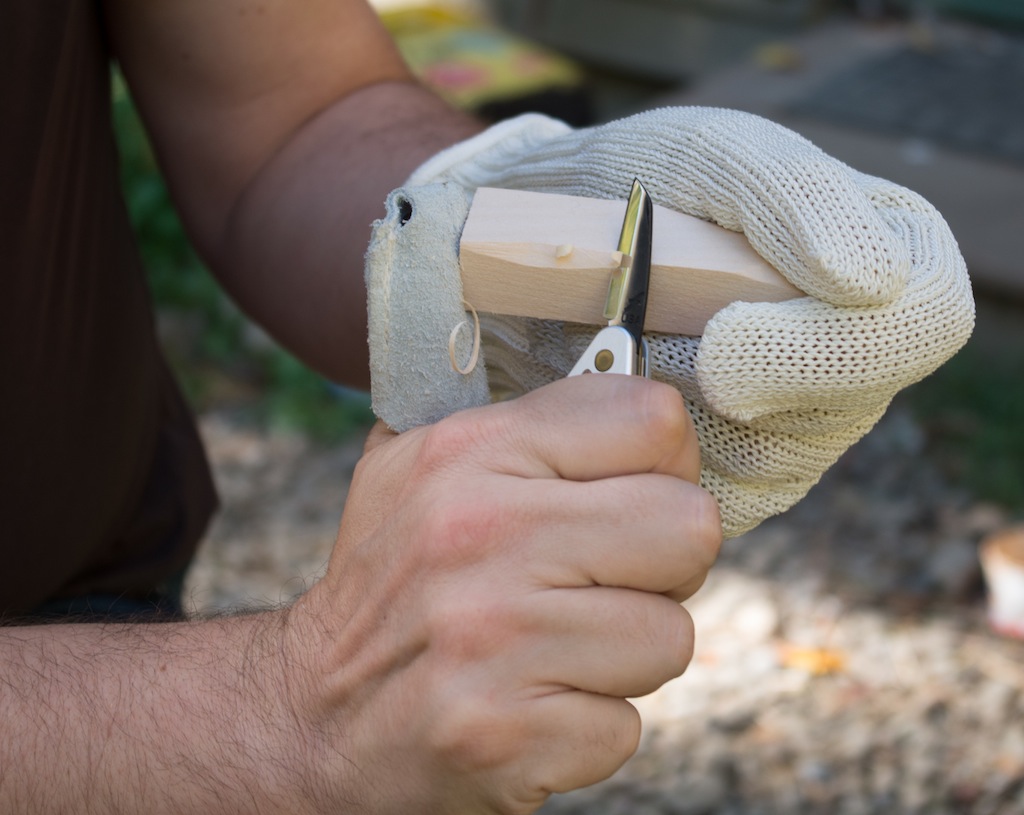
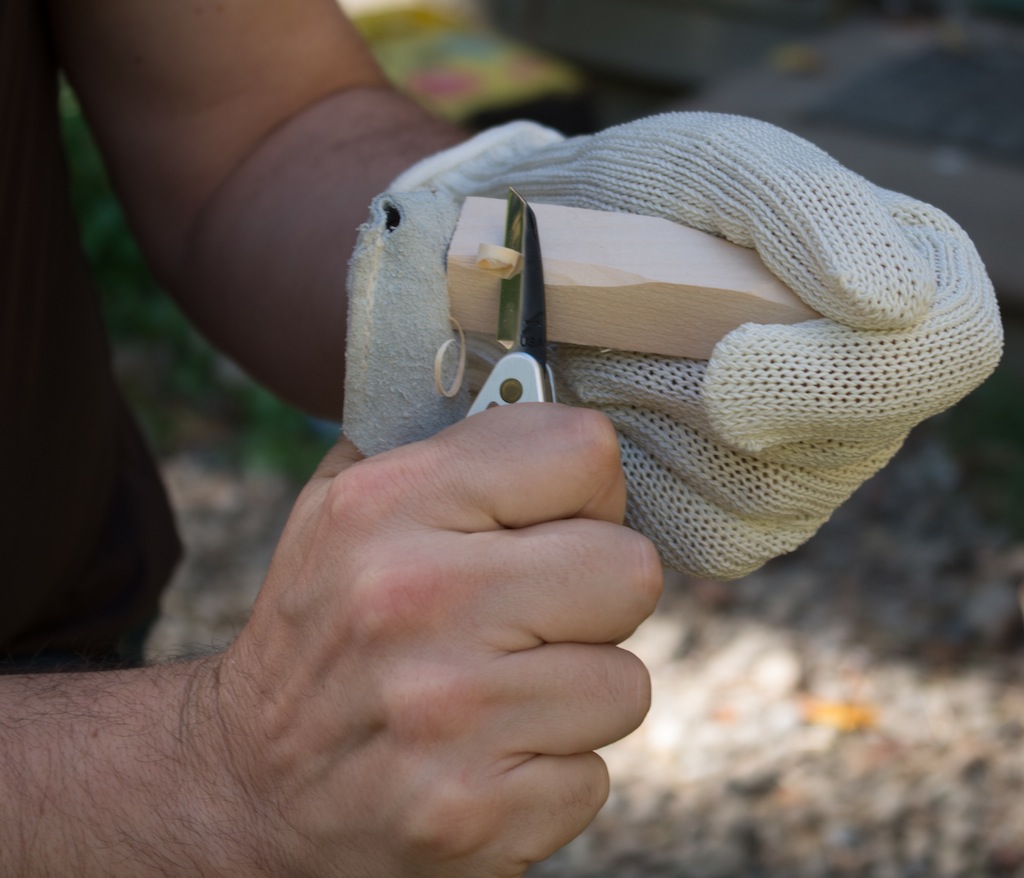
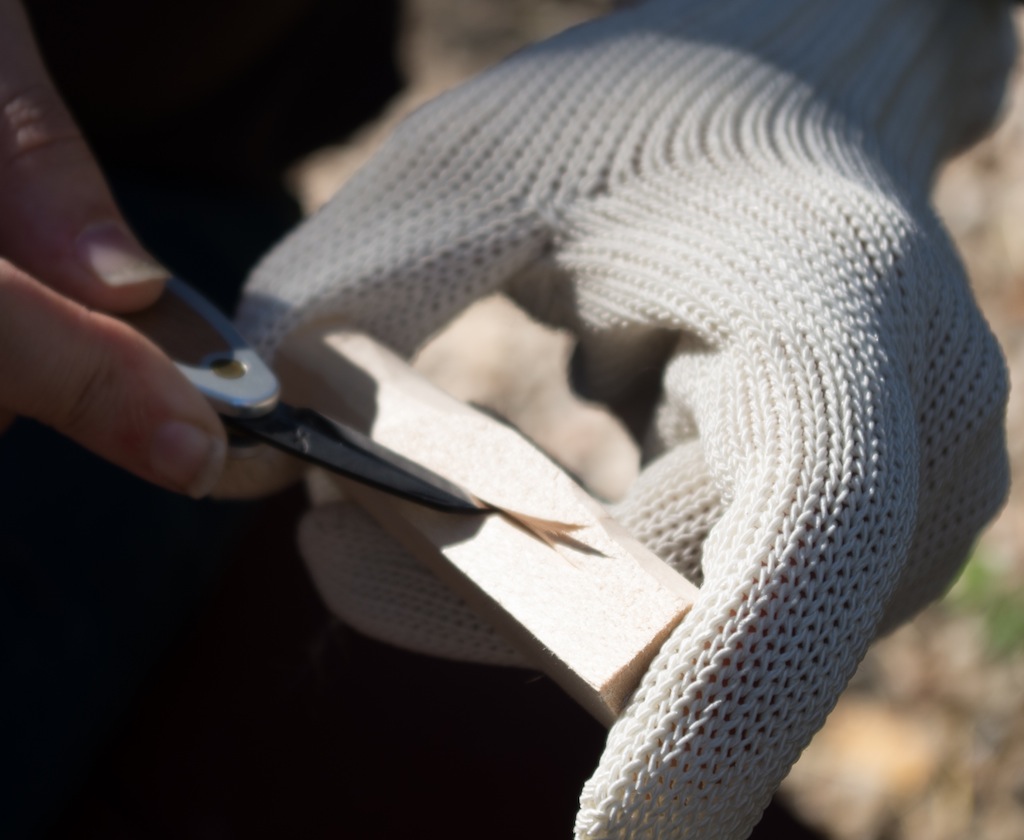
Paring Cuts
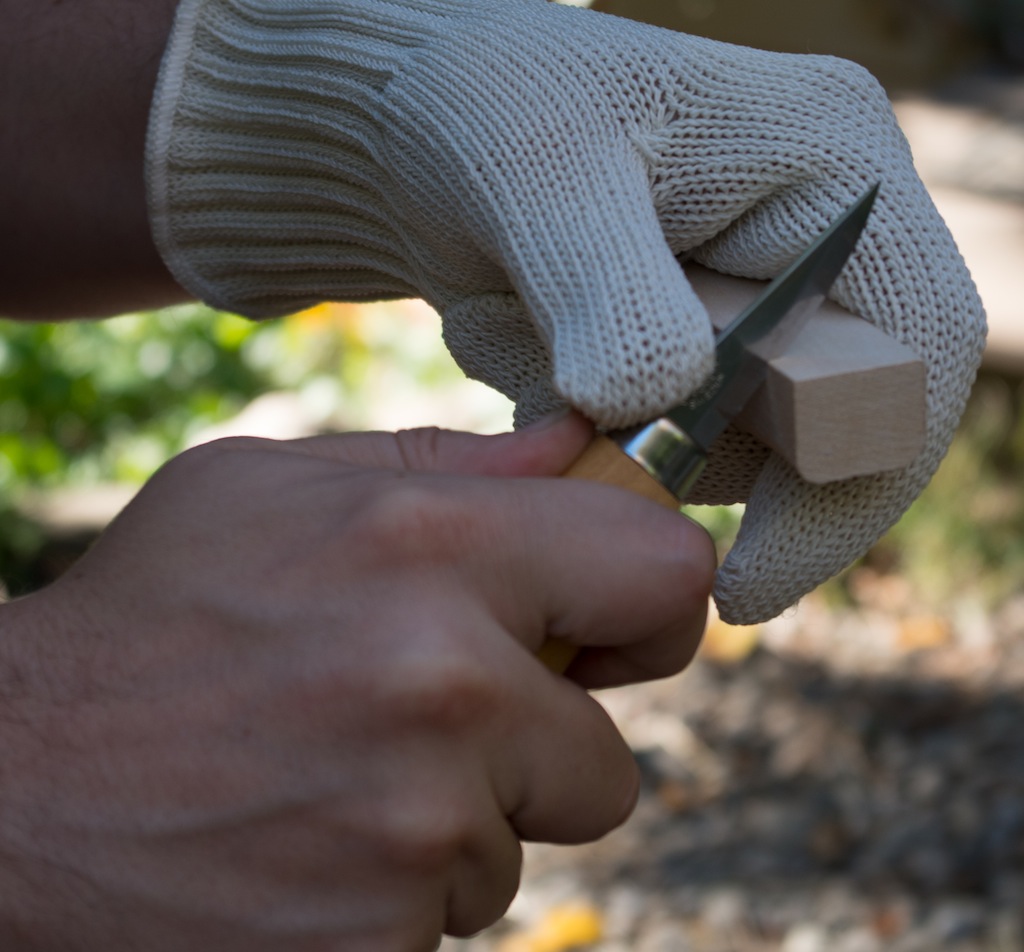
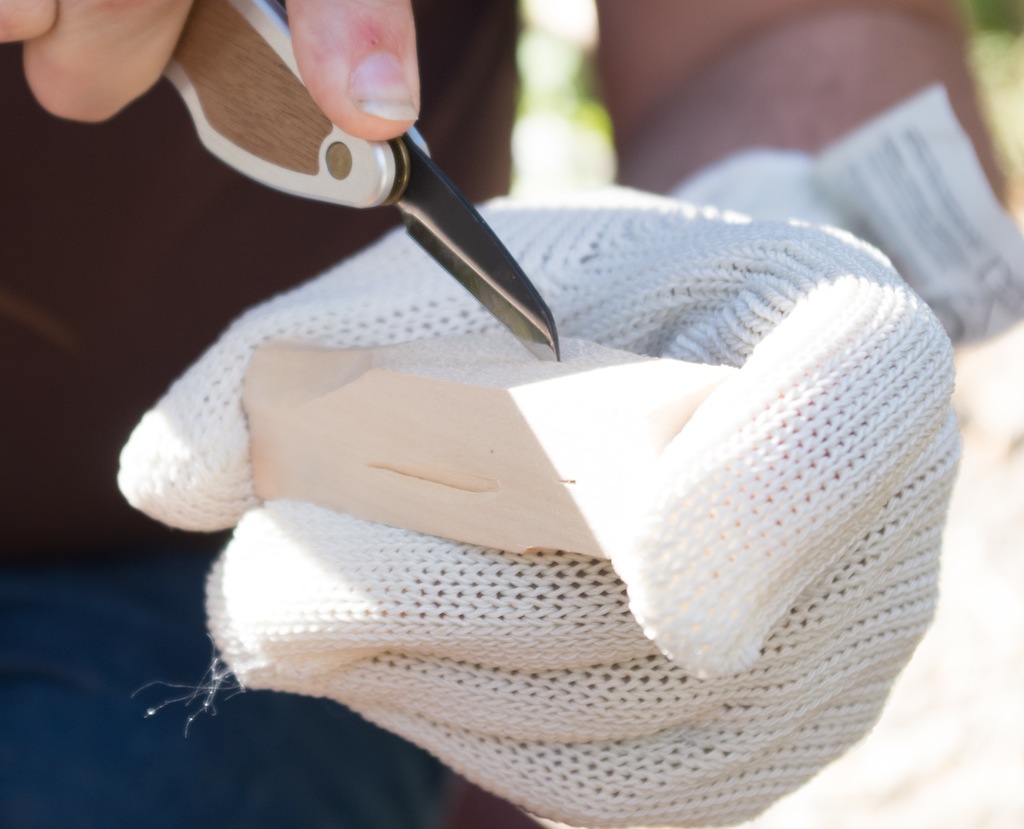
Paring cuts, shown in Figure 2-2 and Figure 2-3, are much like the cuts for peeling vegetables in a kitchen. The knife comes toward your thumb, but in a way that gives you both control and power. A thumb guard is a wise investment when you’re getting started.
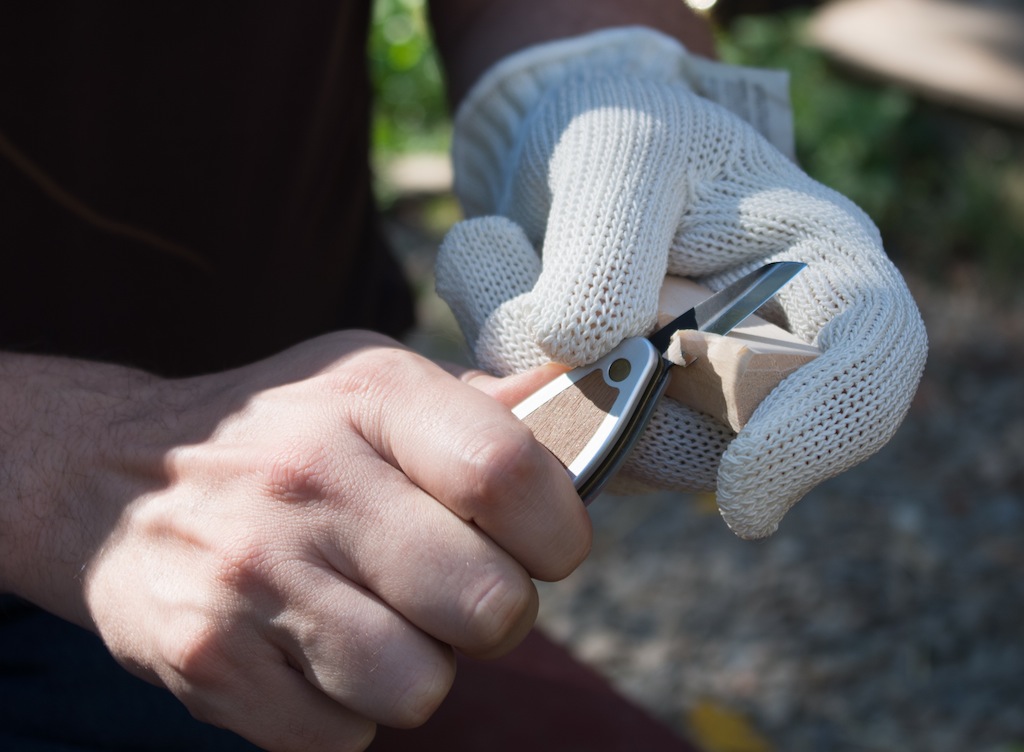
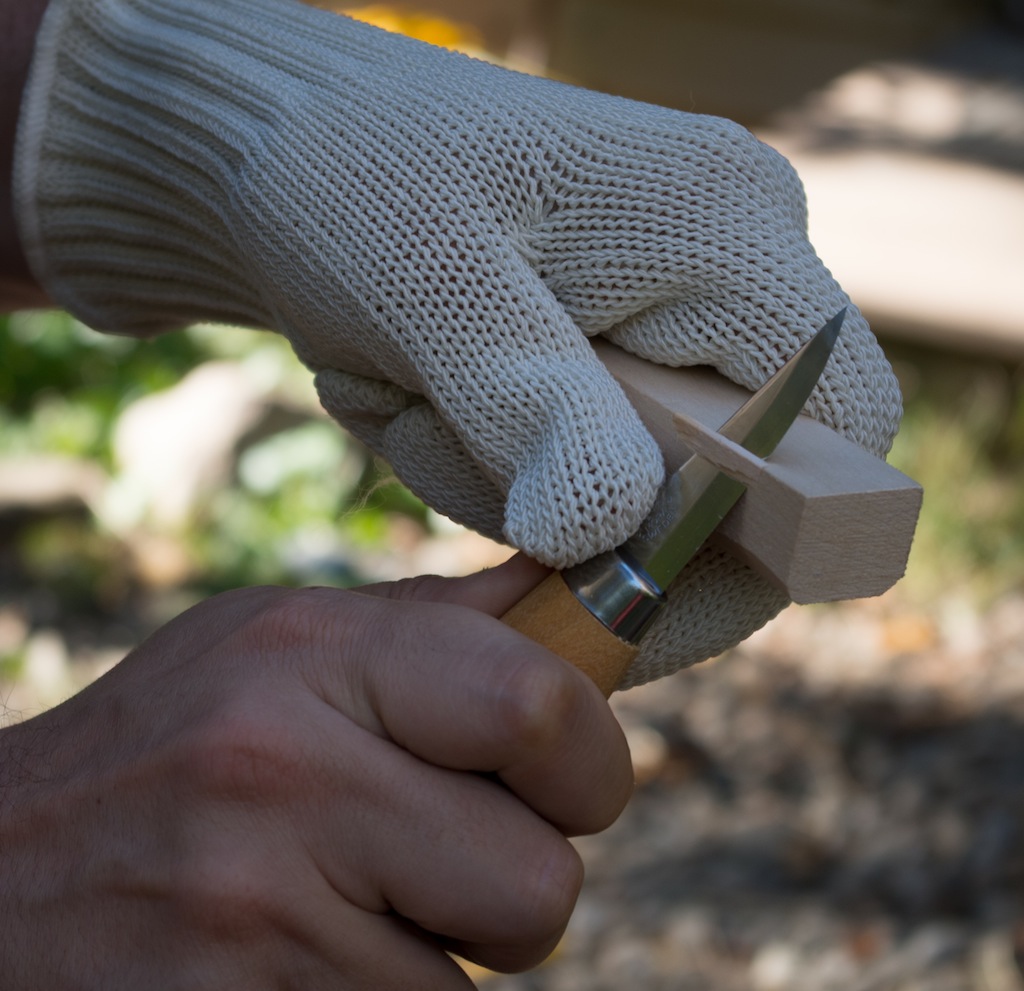
Lever (or Push) Cuts
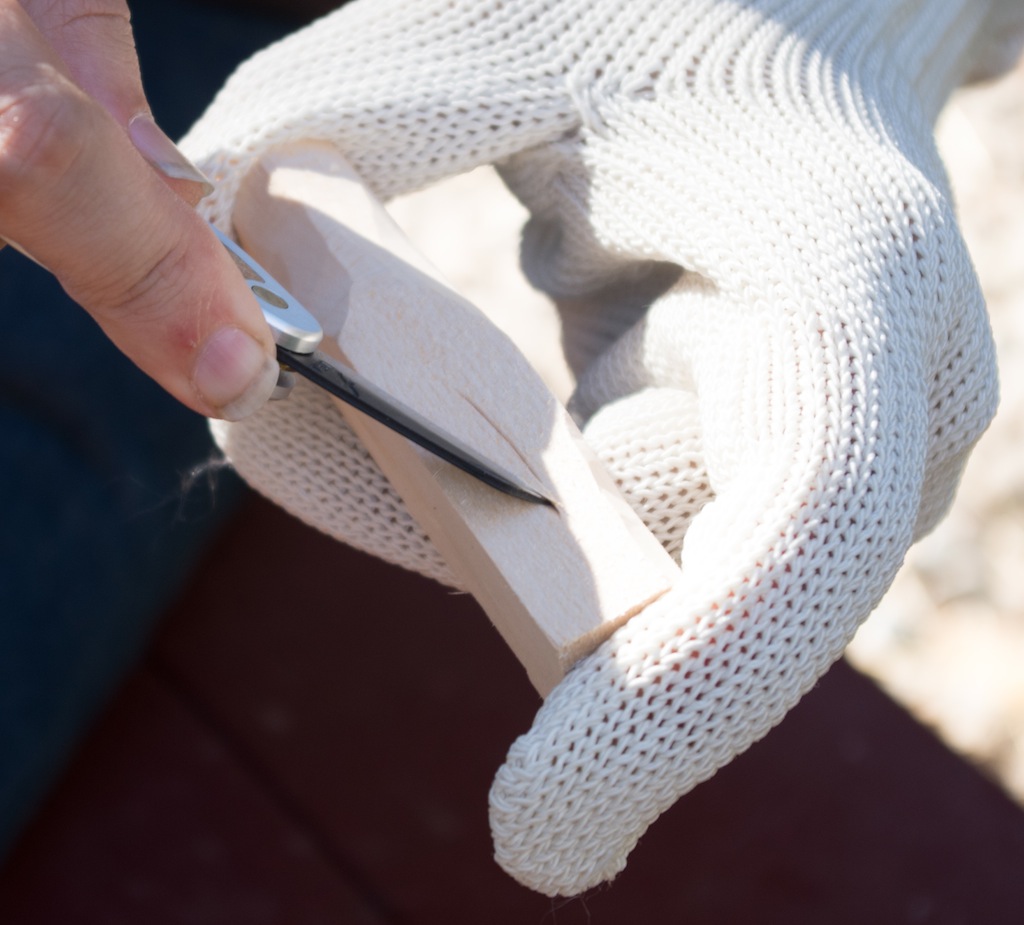
Lever cuts are sometimes called push cuts. It’s not a push with your arm. You use the thumb of the hand that holds the object you’re carving to push on the knife, as shown in Figure 2-4 (and also in Figure 2-5 and Figure 2-6). The hand holding the knife directs where it cuts.
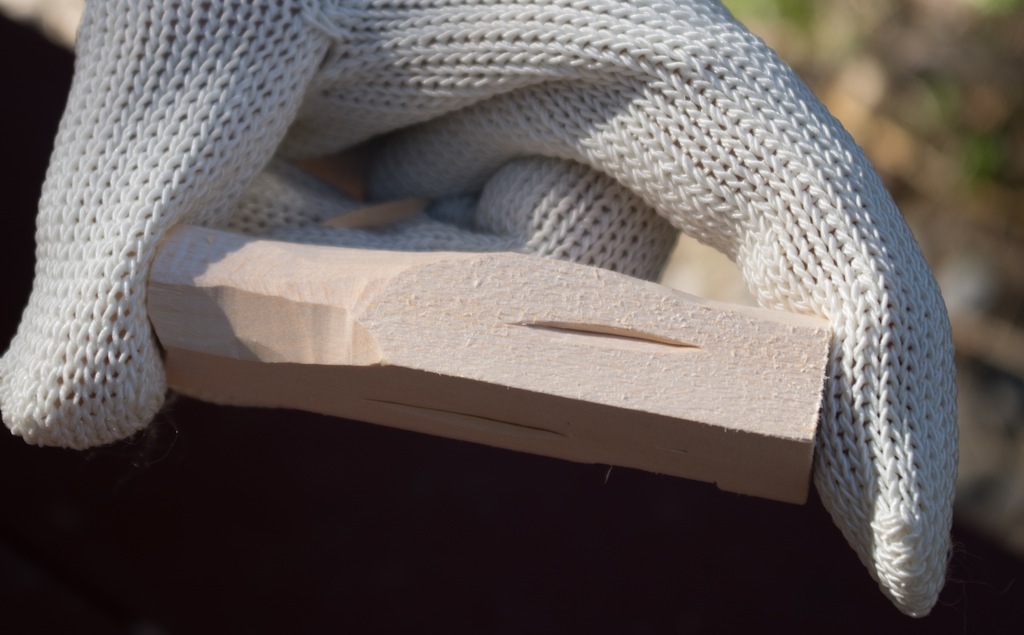
Stop Cuts
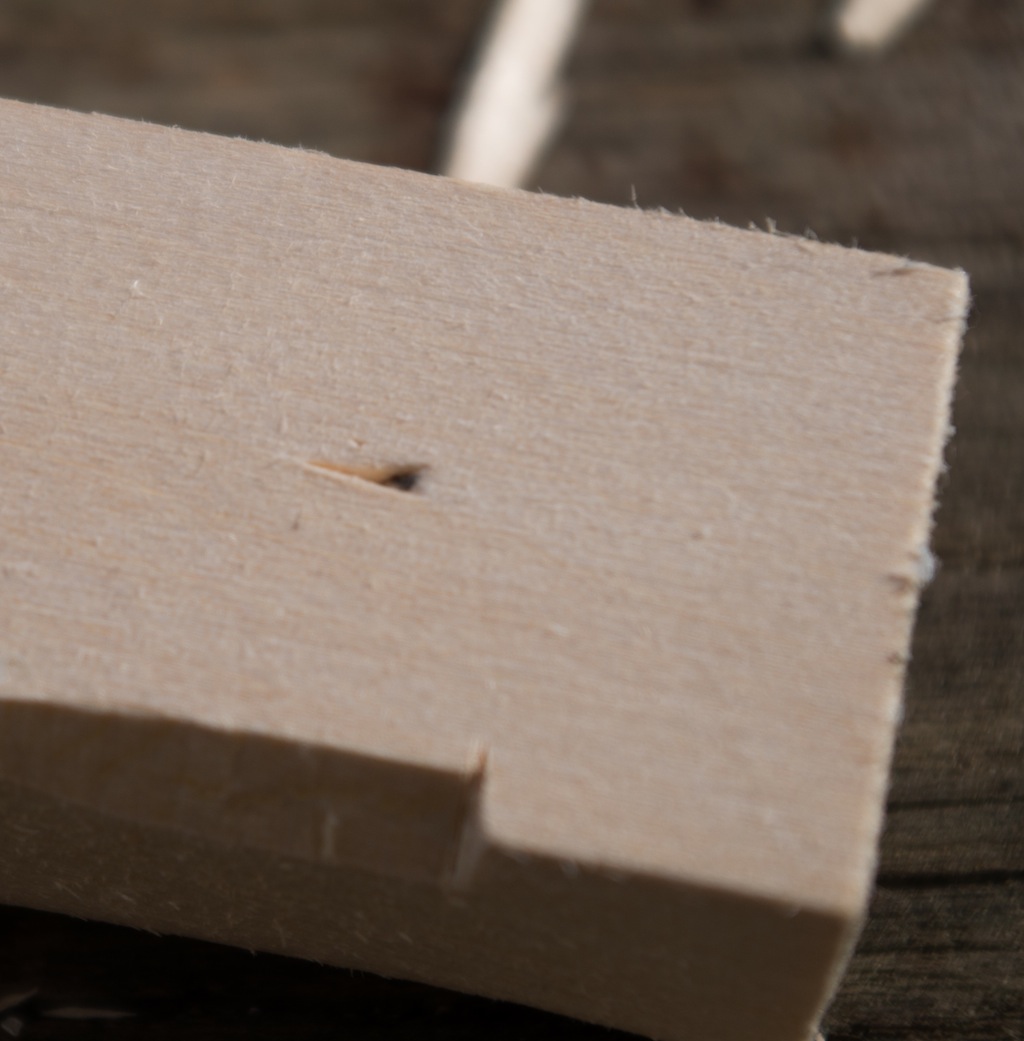
Stop cuts set boundaries for other cuts. They don’t usually remove (much) wood by themselves, but create a gap in the wood that you’ll notice when making a follow-up cut. Figure 2-5 shows one way of making a stop cut, and Figure 2-6 shows a new cut approaching that cut. Figure 2-7 shows the result of this work: a cut that comes to a clean end where the stop cut was placed.
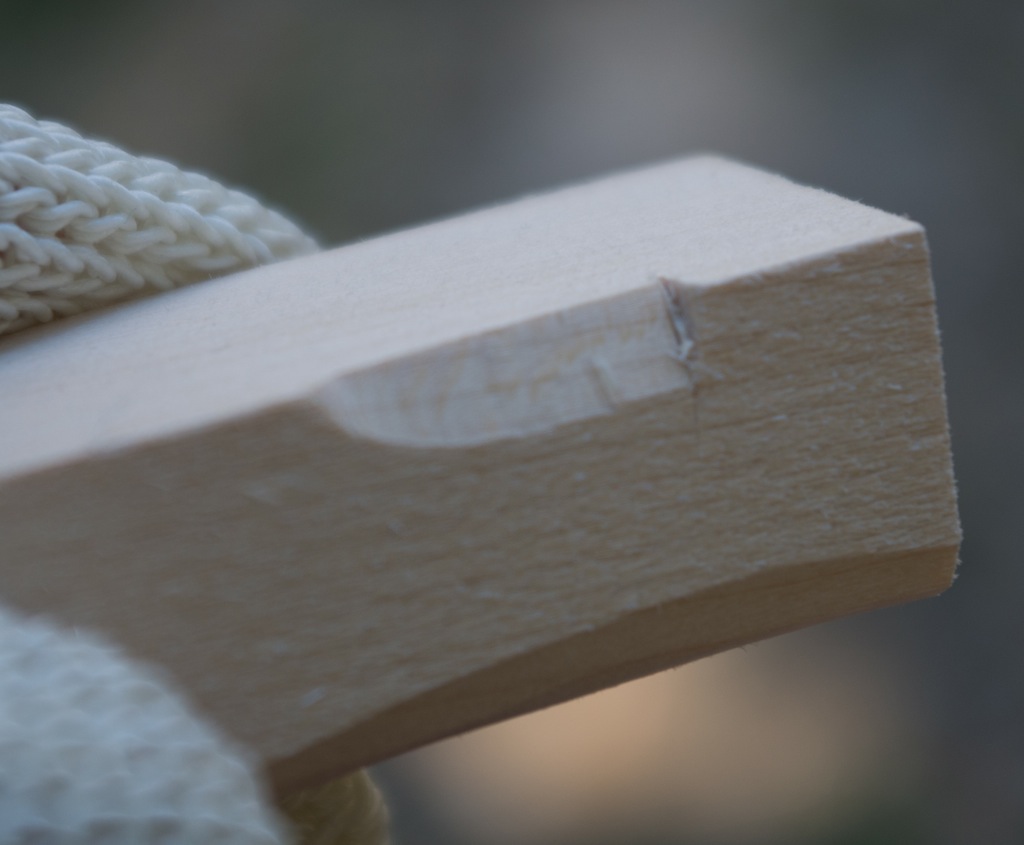
Stop cuts are often the key to detailed carving.
Note
You’ll also make stop cuts or their equivalents with other tools - saws and chisels in particular. Stop cuts are one of the simplest ways to make your work more precise.
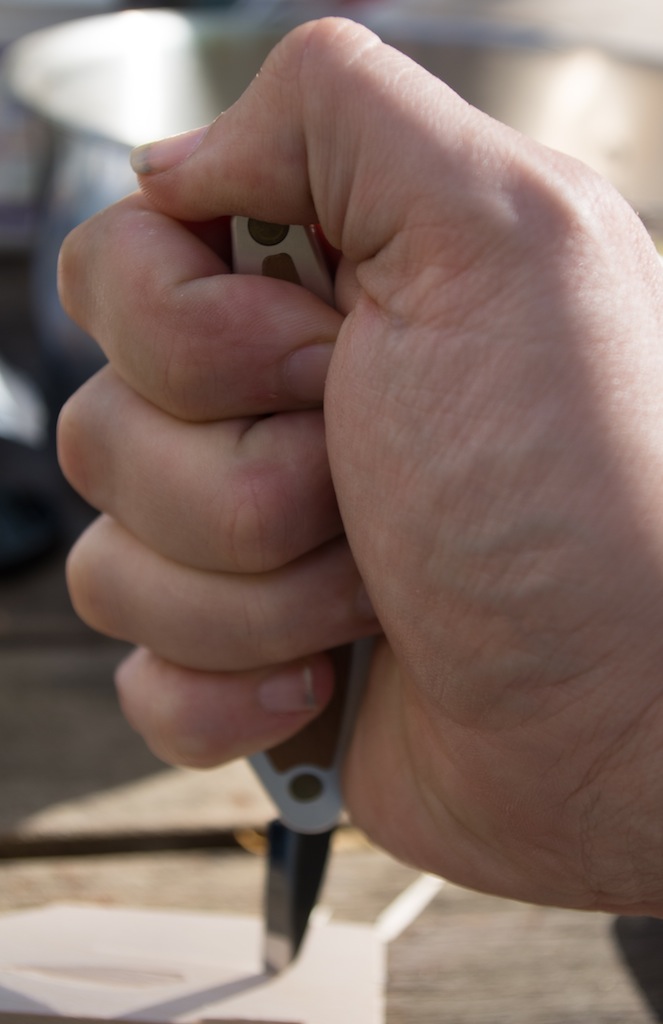
Stab Cuts
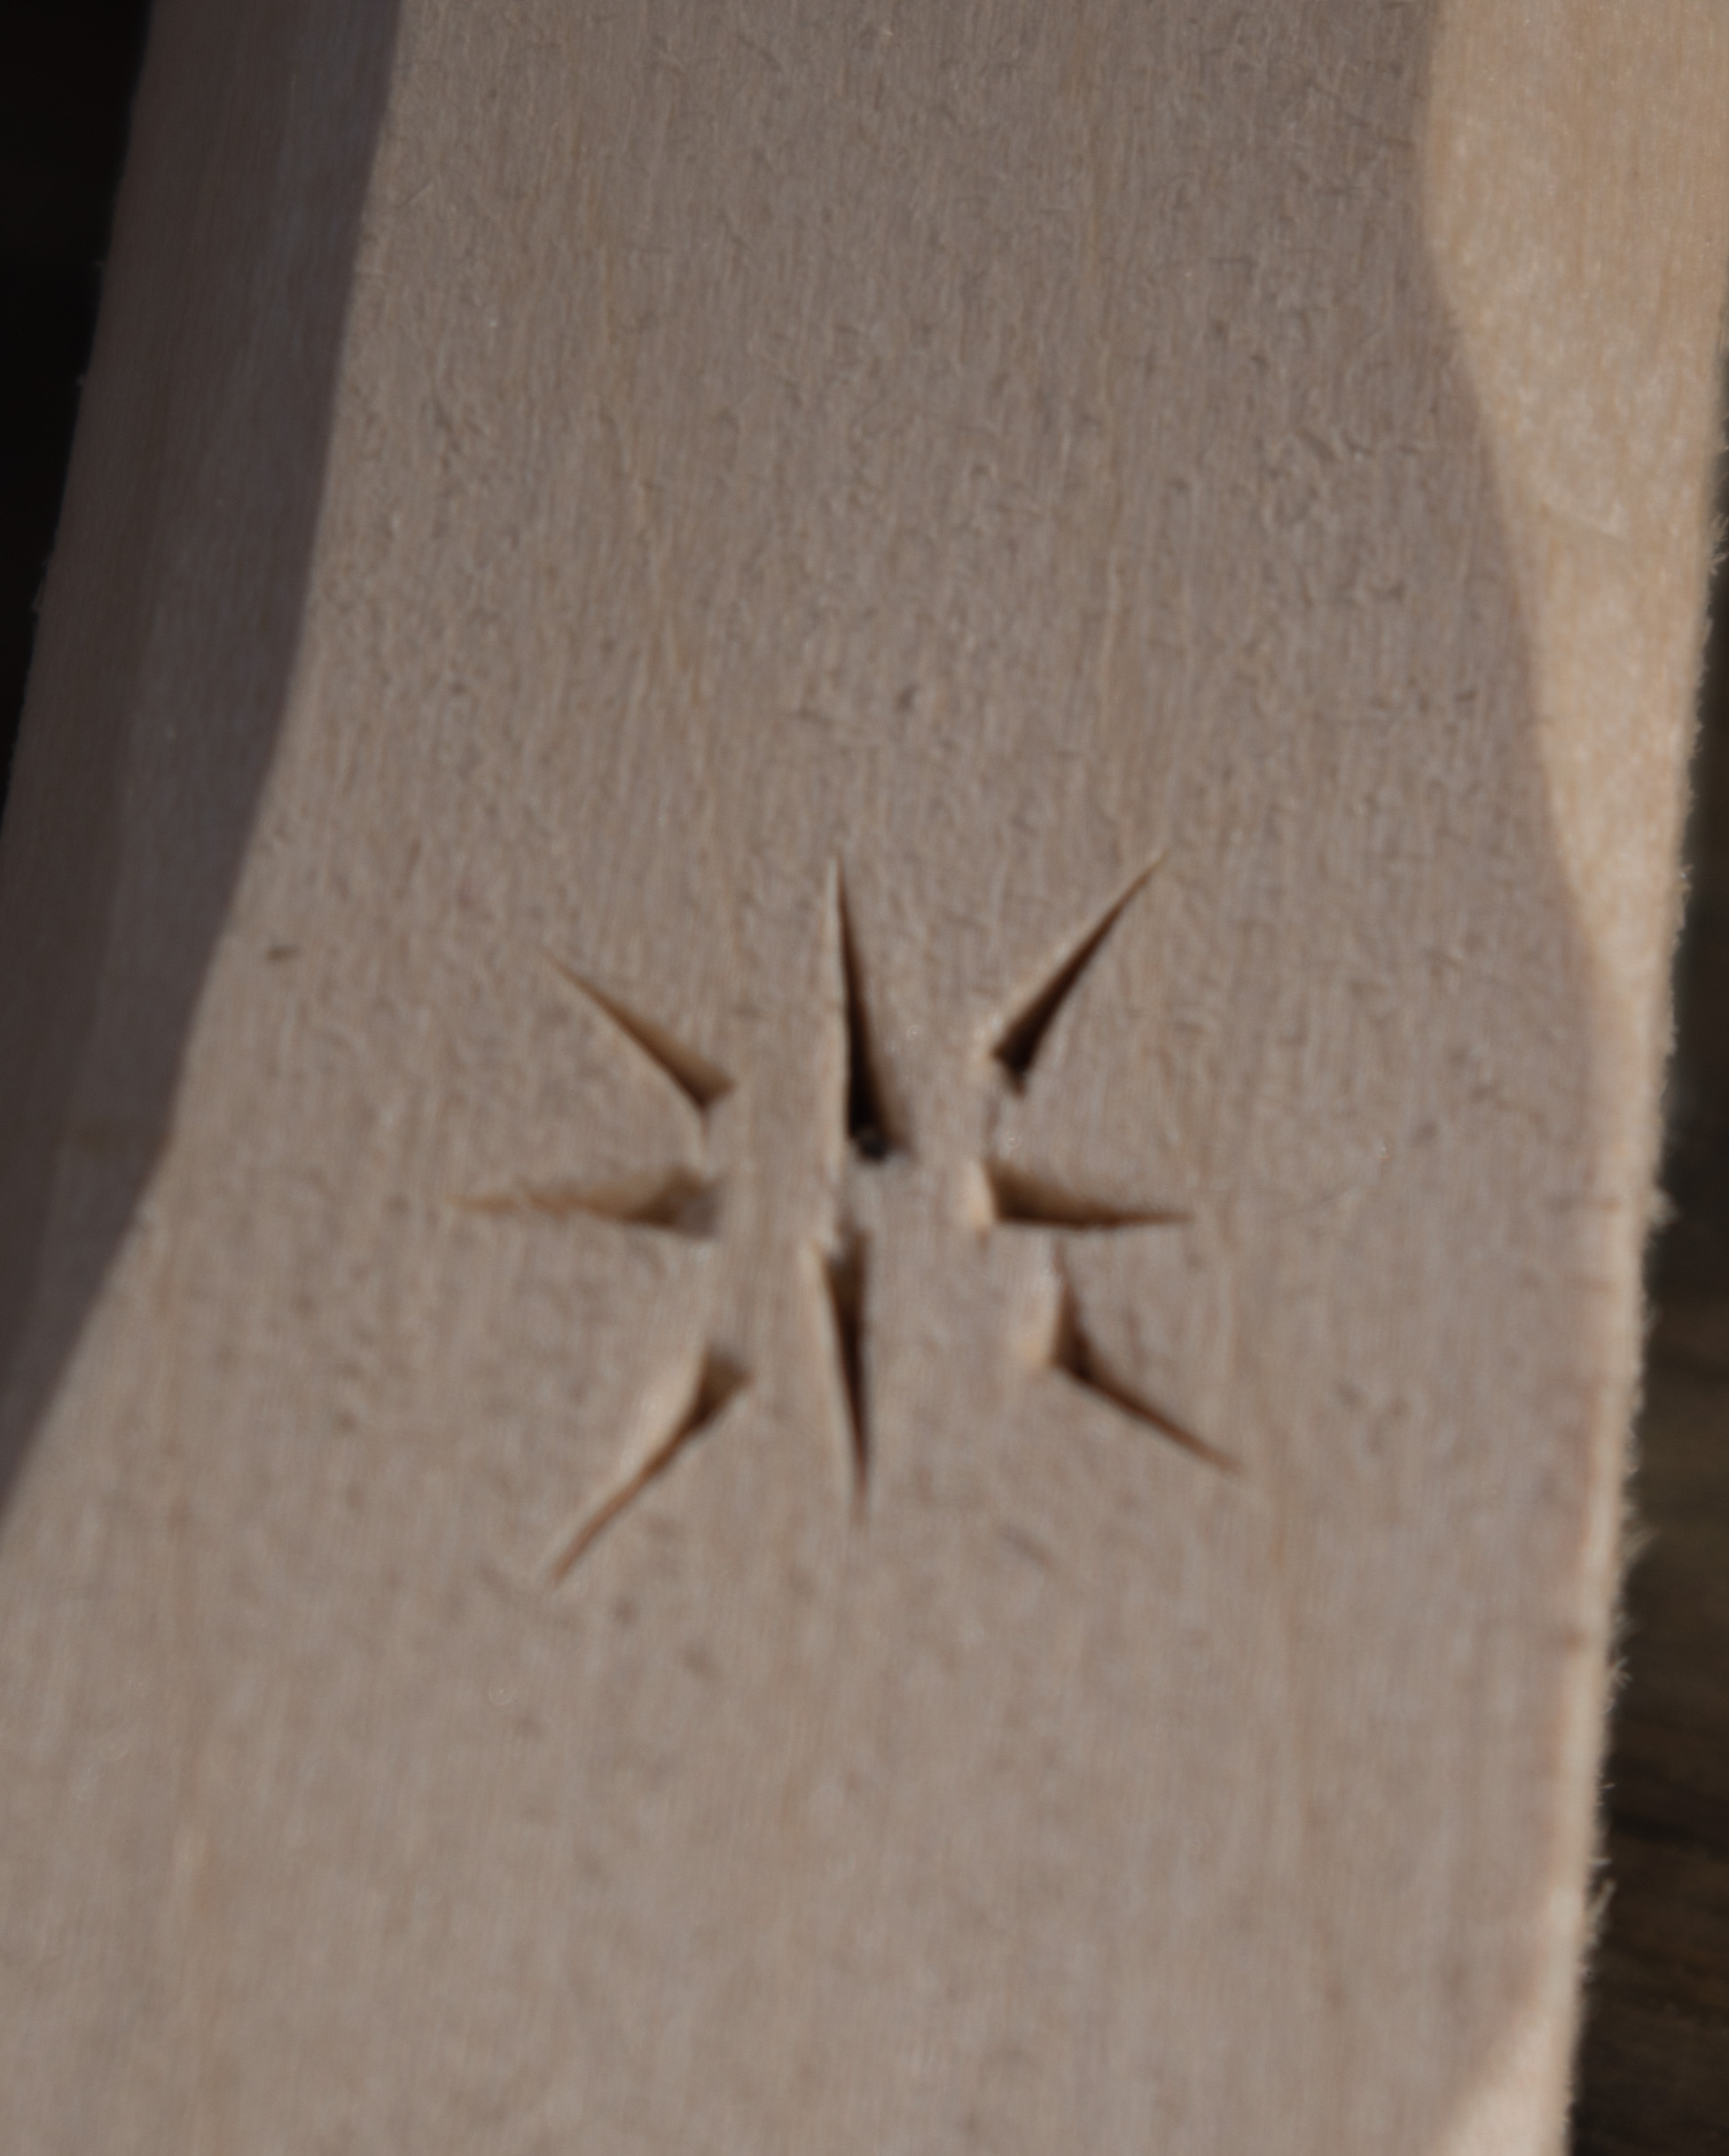
Stab the wood? Really? Stab cuts require a sharp point on the knife, and you shouldn’t twist the knife while it’s stabbed into the wood. Figure 2-8 shows a stab cut in progress. Stab cuts may not look like much (as shown in Figure 2-9), but can work as markers, and sometimes as stop cuts. Clusters of stab cuts can also serve as decoration like that in Figure 2-10.
Warning
Stab cuts and folding knives without locks can be a bad combination. If your stab puts any pressure on the non-cutting side of the knife, the blade can fold on your fingers. It’s probably best not to use folding knives for stab cuts unless they have a locking mechanism.
Chip Cuts
Chip cuts, like stab cuts, use the tip of the knife, but instead of just poking into the wood, they also slice it. Chip cuts let you dig into a flat surface, by connecting cuts to create easily removed bits of wood.
Figure 2-11 through Figure 2-14 show the creation of a long chip through two fairly steep slices into the wood. They meet at the bottom of the chip,
You’ll use these cuts for hollowing in Carving a Boat (and Spoon), and for decoration in Carving a Geometric Border and Carving a Rosette. There are other ways to hold the knife, as you’ll see for example in Carving a Geometric Border, but this will get you started.
A Critical Playtime
Seeing the cuts is one thing, but trying them is much more important. The knife is a perfect tool for random exploration. Get some wood. Basswood from a hobby store or scrap pine (2x4 is fine) will give you something to cut. Round off the edges of the wood, and then try hollowing some of it. Use both hands and see how it feels to work with the opposite hand before you get into a situation where you need to use the opposite hand.
As you’re cutting, don’t just practice the cuts. Pay close attention to how the knife and the wood respond to each other. How does it feel to cut with the grain? Against the grain? Diagonally? Experiment with different angles and depths of cut, and figuring out what makes the wood split instead of cut. Trim the ends to see how cutting across end grain feels. Watch and feel carefully as the knife moves through the wood’s annual rings, especially in pine. See how clean a finish you can get on the wood, and notice how that finish changes as the knife gets duller.
You’ll be using some variation of blade cutting wood for almost everything you do in shaping wood to fit your needs. The knife is the simplest and most flexible way to do that, if not the most efficient. Knives give you a very direct feel for the wood, connecting your hand directly with the resistance they get from the wood. If you haven’t spent much time working with wood (by hand) and exploring its properties, take some serious time with a knife and a few blocks of wood. If you can get a sense of how wood responds to your knife, you’ll have an easier time choosing appropriate ways to deal with cutting wood in a variety of situations.
At the end of playtime, you’ll have a smaller piece of wood and a pile of shavings, plus the sheer thrill of destruction and possibly some helpful calluses on your hands. That’s a good result when you’re getting started!
Dreams
Most woodworkers use knives either for fine work or for a limited number of carving tasks, but knives can do much more.
You can apply more power to a knife if you put handles on both of its ends. This lets you apply your arms and upper body. Drawknives are usually much sturdier than your average knife, with long blades. Because you use both hands to hold the drawknife, you have to hold the work in a vise or in a shaving horse. A shaving horse is a special kind of workbench optimized for holding wood while you apply both hands to pulling or pushing tools along it.
Even without using both hands, you can make a knife do much much more work. The crooked knife, a single blade pulled toward the user, gives Siberians and northern Native Americans a powerful and flexible but extremely portable tool. Mocotaugan: The Story and Art of the Crooked Knife details its evolution and use. Some versions included sharp beaver’s teeth, while many are made from recycled metal pieces like saws, springs, and files. A bend at the end of the knife gave it more flexibility, and the handle was offset a bit, hence the name "crooked".
Users of the crooked knife could make everything from canoes to baskets to toys with it. Combined with an axe to get and split wood, the knife’s portability was a key advantage. It doesn’t require a heavy shaving horse, because it only needs one hand. The other hand can hold the work. One knife can do it all, or at least much more than you’d expect.
For More Information
The Little Book of Whittling, by Chris Lubkemann.
Big Book of Whittle Fun, by Chris Lubkemann.
How to Carve Wood, by Richard Butz.
Carving Magazine.
Woodcarving Illustrated.